プログラムファイル
続いてプログラム側のファイルを作成します。プログラム側ではテンプレートに渡す値を作成したり、最終的にテンプレートを呼び出して画面に表示させたりします。
プログラムは次のようになります。
<?php

require_once('Smarty.class.php');

$smarty = new Smarty();

$smarty->template_dir = 'd:/smartysample/hello/templates/';
$smarty->compile_dir  = 'd:/smartysample/hello/templates_c/';
$smarty->config_dir   = 'd:/smartysample/hello/configs/';
$smarty->cache_dir    = 'd:/smartysample/hello/cache/';

$smarty->assign('msg','Hello World!');
$smarty->display('sample.tpl');

?>
まず最初に「Smarty.class.php」を読み込んでいます。このファイルはSmartyをインストールしたディレクトリの中の「libs」ディレクトリの中に含まれています。上記ではPHPの「include_path」に「libs」ディレクトリが設定されている前提で記述しています。(「include_path」を使わない場合の方法は別のページで確認します)。
「Smarty.class.php」は「Smarty」クラスの定義などが記述されています。
続いて「Smarty」クラスのオブジェクトを作成した後でテンプレートファイルなどを配置した4つのディレクトリを絶対パスで指定しています。指定するには「Smarty」クラスで用意されている「template_dir」メソッドなどを使って指定します。
次に「assign」メソッドを使ってテンプレートファイルに記述された変数に渡す値を設定します。今回は「msg」変数に「Hello World!」と言う値を割り当てるように設定しています。
最後に「display」メソッドを使いテンプレートを呼び出して画面表示を行っています。
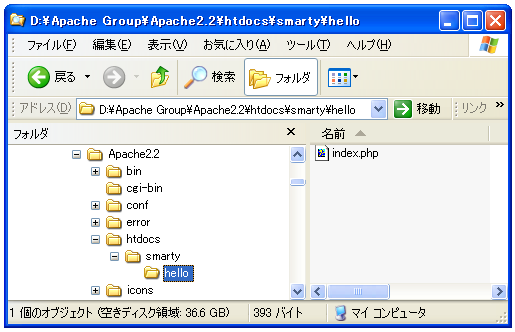
それでは作成したファイルを「sample.php」として保存して下さい。保存する場所は今回はApacheのドキュメントルート以下のディレクトリです。
<?php

require_once('Smarty.class.php');

$smarty = new Smarty();

$smarty->template_dir = 'd:/smartysample/hello/templates/';
$smarty->compile_dir  = 'd:/smartysample/hello/templates_c/';
$smarty->config_dir   = 'd:/smartysample/hello/configs/';
$smarty->cache_dir    = 'd:/smartysample/hello/cache/';

$smarty->assign('msg','Hello World!');
$smarty->display('sample.tpl');

?>
( Written by Tatsuo Ikura )